▼ Backend/└ 스프링 배치 (Spring Batch)
Spring Batch | 간단한 스프링 배치 시작하기
Valar
2022. 3. 1. 18:05
반응형
이전 글) 스프링 배치 (Spring Batch)] 스프링 배치란 무엇인가?
📌 구성 환경
Spring Boot 2.6.3, Java 1.8, MariaDB
📝 샘플 데이터베이스, 테이블 생성
-- venh_batch 데이터베이스
CREATE DATABASE IF NOT EXISTS `venh_batch`;
USE `venh_batch`;

-- 테이블 venh_batch.market
CREATE TABLE IF NOT EXISTS `market` (
  `id` bigint(20) NOT NULL AUTO_INCREMENT,
  `name` varchar(50) DEFAULT NULL,
  `price` int(11) DEFAULT NULL,
  PRIMARY KEY (`id`)
) ENGINE=InnoDB AUTO_INCREMENT=3 DEFAULT CHARSET=utf8mb4;

-- 데이터 삽입하기
INSERT IGNORE INTO `market` (`id`, `name`, `price`) VALUES
(1, 'apple', 1000),
(2, 'banana', 800);
Dependency 추가
spring batch와 같이 사용될 jpa, quartz, lombok도 같이 추가한다.
build.gradle
implementation 'org.springframework.boot:spring-boot-starter-data-jpa'
implementation 'org.springframework.boot:spring-boot-starter-batch'
implementation 'org.springframework.boot:spring-boot-starter-quartz'
compileOnly 'org.projectlombok:lombok'
runtimeOnly 'org.mariadb.jdbc:mariadb-java-client'
annotationProcessor 'org.projectlombok:lombok'
Application.yml
spring:
 batch:
  job:
   enabled: false
  jdbc:
   initialize-schema: always
# batch-core script sql을 실행
# batch-core package 안에 초기화 sql 문들이 들어있다.
# 기본적으로 메모리 DB들은 자동적으로 실행될 때 해당 스크립트들을 실행하고 다른 종류에 데이터베이스들은 위와 같은 설정으로 script sql을 실행시킬 수 있다.

 datasource:
  driverClassName: org.mariadb.jdbc.Driver
  url: jdbc:mariadb://localhost:3306/venh_batch
  username: admin
  password: pwd1@#

logging:
  level:
    root: info
배치 기능 활성화
Application 클래스에 @EnableBatchProcessing 추가
import org.springframework.batch.core.configuration.annotation.EnableBatchProcessing;
import org.springframework.boot.SpringApplication;
import org.springframework.boot.autoconfigure.SpringBootApplication;

@EnableBatchProcessing // 배치 기능 활성화
@SpringBootApplication
public class BatchApplication {
    public static void main(String[] args) {
        SpringApplication.run(BatchApplication.class, args);
    }
}
Market Entity 생성
@Setter
@Getter
@Entity
public class Market {
    @Id
    @GeneratedValue(strategy = GenerationType.IDENTITY)
    private Long id;
    private String name;
    private int price;

    @Override
    public String toString() {
        return "Market [id=" + id + ", name=" + name + ", price=" + price + "]";
    }
}
Batch Config 생성
job 생성하며 step을 실행한다.
step에는 tasklet과 chunk 지향 처리가 있는데 자세한 내용은 이전 글을 확인한다. 여기서는 chunk 지향 처리로 진행되며, reader, processor, writer 순서로 진행된다.
reader
Market를 조회하는 과정으로 조건을 지정할 수 있으며 페이징 처리도 가능하다.
price가 1000 이상인 데이터를 페이징 사이즈 10으로 조회하는 과정이다.
processor
조회한 데이터를 가공할 수 있으며 여기서는 조회된 price에 +100을 추가한다.
writer
가공한 데이터를 처리한다.
Chunk 단위만큼 쌓이게 되면 Writer에 전달하고 Writer는 일괄 저장한다.
@Slf4j
@Configuration
@RequiredArgsConstructor
public class BatchConfig {

    private final JobBuilderFactory jobBuilderFactory;
    private final StepBuilderFactory stepBuilderFactory;
    private final EntityManagerFactory entityManagerFactory;

    // exampleJob 생성
    @Bean
    public Job exampleJob() throws Exception {
        return jobBuilderFactory.get("exampleJob")
            .start(exampleStep()).build();
    }

    // exampleStep 생성
    @Bean
    @JobScope
    public Step exampleStep() throws Exception {
        return stepBuilderFactory.get("exampleStep")
            .<Market, Market> chunk(10)
            .reader(reader(null))
            .processor(processor(null))
            .writer(writer(null))
            .build();

        // 		### Tasklet Example ###
        //		return stepBuilderFactory.get("exampleStep")
        //				.tasklet(new ExampleTasklet()).build();
    }

    @Bean
    @StepScope
    public JpaPagingItemReader <Market> reader(@Value("#{jobParameters[requestDate]}") String requestDate) throws Exception {
        log.info("==> reader value : " + requestDate);

        Map <String, Object> parameterValues = new HashMap<>();
        parameterValues.put("price", 1000);

        return new JpaPagingItemReaderBuilder <Market> ()
            .pageSize(10)
            .parameterValues(parameterValues)
            .queryString("SELECT m FROM Market m WHERE m.price >= : price")
            .entityManagerFactory(entityManagerFactory)
            .name("JpaPagingItemReader")
            .build();
    }

    @Bean
    @StepScope
    public ItemProcessor <Market, Market> processor(@Value("#{jobParameters[requestDate]}") String requestDate) {
        return new ItemProcessor <Market, Market> () {
            @Override
            public Market process(Market market) throws Exception {
                log.info("==> processor Market : " + market);
                log.info("==> processor value : " + requestDate);

                // 100원 추가
                market.setPrice(market.getPrice() + 100);
                return market;
            }
        };
    }

    @Bean
    @StepScope
    public JpaItemWriter <Market> writer(@Value("#{jobParameters[requestDate]}") String requestDate) {
        log.info("==> writer value : " + requestDate);

        return new JpaItemWriterBuilder <Market>()
            .entityManagerFactory(entityManagerFactory)
            .build();
    }
}
Scheduler 설정
배치를 일정 주기로 실행시키기 위해서 Scheduler를 구현한다.
Scheduler 간격은 테스트 진행을 위해 fixedDelay 30000(30초) ms으로 되어있으니 상황에 맞게 조정하여 사용한다. 시간뿐만 아니라 요일, 오전, 오후 등 모두 설정 가능하다.
requestDate 이름으로 jobParameter로 생성하고 jobLauncher를 통해 job를 실행한다.
@Slf4j
@EnableScheduling // 스케쥴러 기능 활성화
@RequiredArgsConstructor
@Component
public class ExampleScheduler {

    private final Job job;
    private final JobLauncher jobLauncher;

    @Scheduled(fixedDelay = 30000)
    public void startJob() {
        try {
            Map <String, JobParameter> jobParametersMap = new HashMap < > ();

            SimpleDateFormat format1 = new SimpleDateFormat("yyyy-MM-dd HH:mm:ss");
            Date time = new Date();

            String time1 = format1.format(time);

            jobParametersMap.put("requestDate", new JobParameter(time1));

            JobParameters parameters = new JobParameters(jobParametersMap);

            JobExecution jobExecution = jobLauncher.run(job, parameters);

            while (jobExecution.isRunning()) {
                log.info("isRunning...");
            }

        } catch (JobExecutionAlreadyRunningException e) {
            e.printStackTrace();
        } catch (JobRestartException e) {
            e.printStackTrace();
        } catch (JobInstanceAlreadyCompleteException e) {
            e.printStackTrace();
        } catch (JobParametersInvalidException e) {
            e.printStackTrace();
        }
    }
}
실행 콘솔 로그

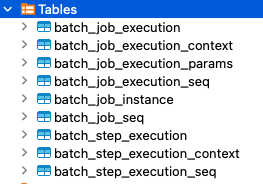
이전 글에서 설명한 배치 관련 테이블이 같이 생성된다.
GitHub
반응형